This is a place where I collect and archive recipes from all over the place. These recipes were picked because these are food that I love to eat. I copied the recipes from other sources and I have included the links to each source.

I have cooked some of these dishes and I would be happy to discuss my story with you. Feel free to email me at scientistcooks@gmail.com or check out my food blog www.foodmolecule.blogspot.com

Tuesday, September 18, 2012

Another mac and cheese

http://suziethefoodie.blogspot.com/2012/03/anne-burrells-killer-mac-cheese-with.html

Anne Burrell's Killer Mac & Cheese with Bacon

Anne Burrell's Killer Mac & Cheese with Bacon

Chef Anne Burrell is a rock star. That is obvious in her cookbook Cook Like a Rock Star, published by Random House of Canada. Not just because she is so flippin' awesome but because you can hear her voice in every recipe. Not just in the intro but throughout the directions too. I was so excited to cook with her I could not wait to make one of her fabulous dishes and start my journey into the foodie hall of fame.

Anne Burrell's Killer Mac & Cheese with Bacon

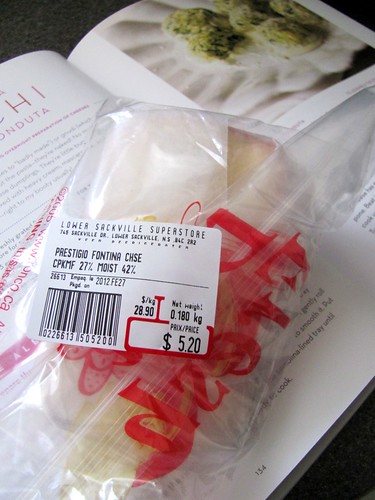
I was going to attempt her Spinach & Ricotta Gnocchi with Fontina Fonduta first but there was a lot of prep that I noticed thanks to the "Anne Alert!" box which I really appreciated. I decided instead to make her "killler" mac and cheese:

"Great mac and cheese should be creamy and tangy and luscious... And it's got bacon! What could be better?" ~ Chef Anne Burrell

The Recipe

Anne Burrell's Killer Mac & Cheese with Bacon

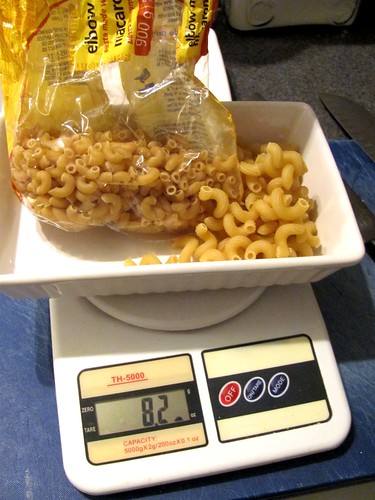
I divided the recipe in half but will write it in full for you. You will need 1 lb of shells or other short pasta. I used a combo of pastas because I really need to go grocery shopping.

Anne Burrell's Killer Mac & Cheese with Bacon Anne Burrell's Killer Mac & Cheese with Bacon

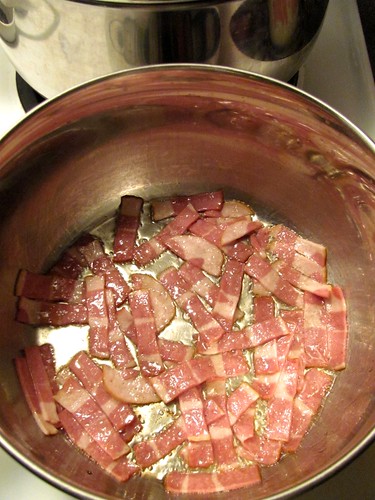
Slice 6 pieces of bacon crosswise into 1/2" strips. Drizzle some olive oil into a large saucepan and add the bacon. Bring pan to medium heat, stirring occasionally. When it is brown and crispy, drain on paper towel. Do not discard bacon fat.

I used turkey bacon which has much less fat that regular bacon. If you prefer turkey bacon then let the oil heat up first and then add the strips. Mine stuck to the pan quite a bit! You may have to also add extra oil to make the sauce.

Anne Burrell's Killer Mac & Cheese with Bacon

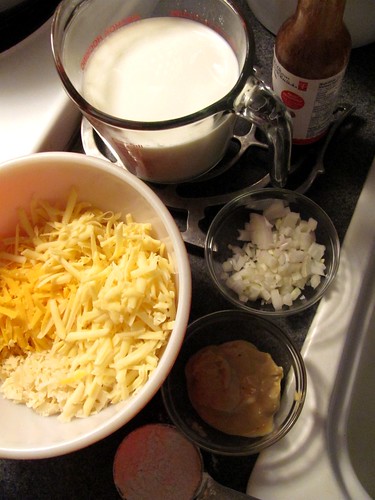
When you make a cream sauce, you absolutely have to do the "mis en place" prep and have it close by.

Anne Burrell's Killer Mac & Cheese with Bacon Anne Burrell's Killer Mac & Cheese with Bacon

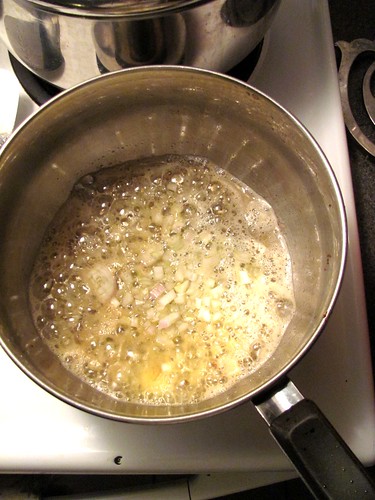
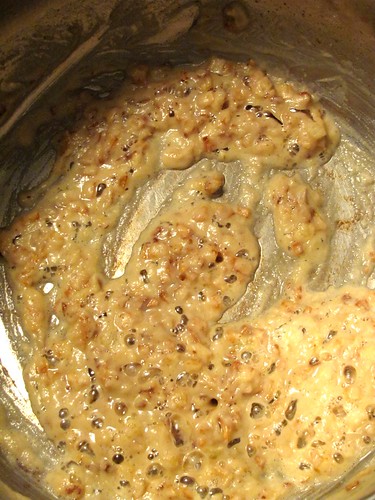
Add 3 tbsp of unsalted butter and 1 onion cut into 1/4" dice to the pan and season with salt. Cook until soft and aromatic, around 8 to 10 minutes. Add 1/2 cup flour, stirring frequently for 4 to 5 minutes until mixture looks like wet sand.

I used shallots instead of onions which is why mine caramelized a lot. Thankfully it did not burn but it got close! So if you use shallots, cook for less time.

 Anne Burrell's Killer Mac & Cheese with Bacon

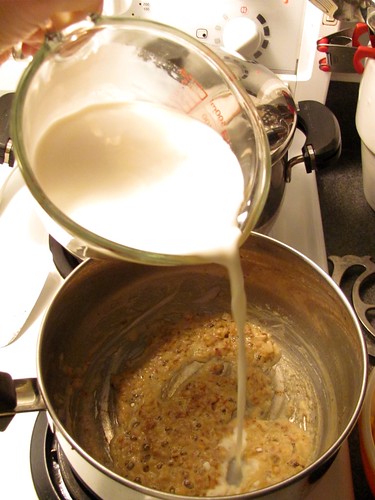
Slowly whisk in 1 quart of whole milk, season with salt and bring to a boil.

Anne Burrell's Killer Mac & Cheese with Bacon

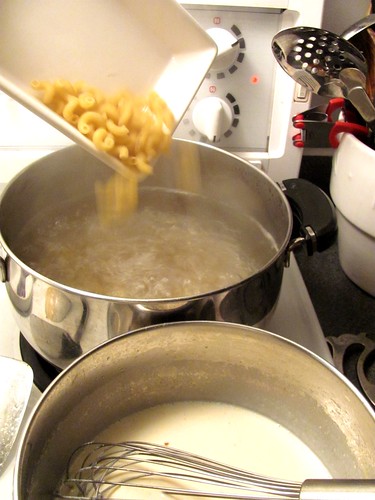
It was around this point I added my pasta to salted boiling water. Anne says to cook 1 minute less than packaging instructs but I usually cook it the minimum the package says to. I do not like my pasta to have too much bite.

Bring milk mixture to a boil, reduce to a simmer and cook over low heat for 8 to 10 minutes until the mixture is slightly thicker than heavy cream.

Anne Burrell's Killer Mac & Cheese with Bacon Anne Burrell's Killer Mac & Cheese with Bacon

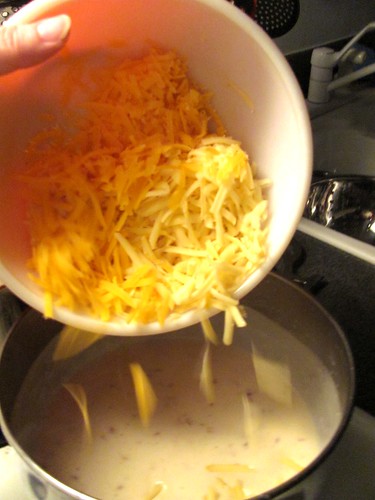
Add 2 cups of grated cheddar, 2 cups of freshly grated Fontina and 1 cup of freshly grated Parmigiano. Whisk to combine. Add 1/4 cup Dijon mustard.

Anne Burrell's Killer Mac & Cheese with Bacon Anne Burrell's Killer Mac & Cheese with Bacon

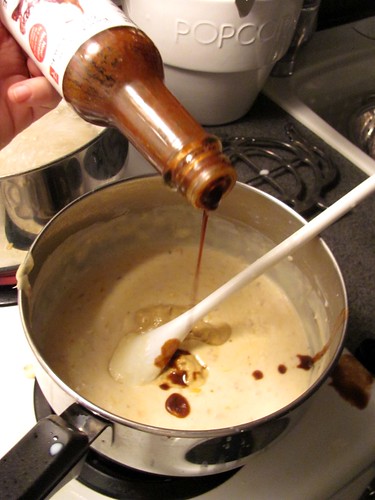
Add a few shakes of Tabasco and check seasoning. If sauce is too thick, add more milk. Pour over cooked and well-drained pasta.

I used a President's Choice chipotle hot sauce (that no longer appears to be on their site) which is delicious but the top fell off and I drizzled in a ton, as well as getting it all over my stovetop.

Anne Burrell's Killer Mac & Cheese with Bacon

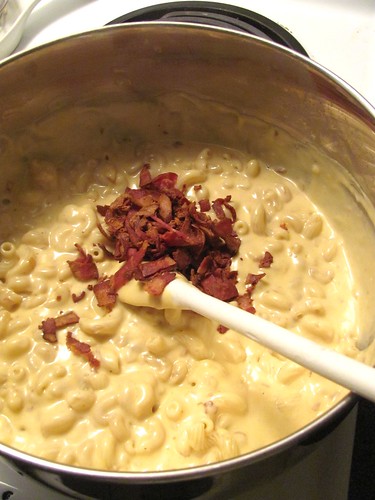
Stir in the cooked bacon and it is ready!

Foodie Conclusion

Anne Burrell's Killer Mac & Cheese with Bacon

Killer mac & cheese? You bet it is! Holy macaroni. Or should I call it devilish?!

It was the best mac and cheese Reg and I have ever had. Honestly. And I have made a lot! I found it interesting that she did not put it in a casserole dish, top with breadcrumbs... As a result, this is the sauciest, richest mac and cheese you can imagine.

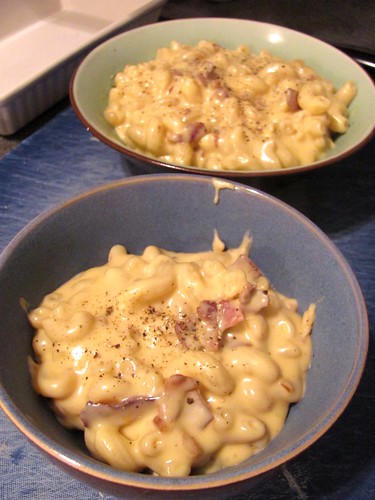
I served it for dinner in small bowls and Reg loved it so much at the first bite he mourned how little he had (see back bowl). I said, finish it and then see how you feel. Sure enough, by the last bite he was done. Craaaaaaaaaaaaaazy rich. A cheese lover's dream come true.

Jean-Georges Vongerichten’s Fried Sushi Cakes With Scallops, Honey Soy Sauce and Chipotle Mayonnaise

Source:
http://www.nytimes.com/recipes/12771/Jean-Georges-Vongerichtenrsquos-Fried-Sushi-Cakes-With-Scallops-Honey-Soy-Sauce-and-Chipotle-Mayonnaise.html

and

http://www.nytimes.com/2012/09/19/dining/excellence-on-the-plate-even-without-a-chefs-edge.html?hpw


  • FACEBOOK
  • TWITTER
  • GOOGLE+
  • E-MAIL
  • SHARE
  • PRINT
  • REPRINTS
IF you’re a chef — a great one — you will go to almost any length to gain marginal improvement in a recipe. You’ll find the best provider for every given ingredient, and if you can gain an edge by fussing with those ingredients, you will. (Chances are you’re not the one doing the work anyway.) These kinds of differences define the food of the most talented chefs, at least those successful enough to indulge their talents.
Multimedia
It’s also why their recipes are often as annoying as running out of garlic.
I’ve spent some time trying to make those kinds of recipes more accessible, as often as not with Jean-Georges Vongerichten; we’ve been friends since he moved to New York in the mid-1980s, and have written two books together.
It’s been a while since we worked together, but his recipe here, for fried cakes of sushi-style rice topped with chipotle mayonnaise and raw scallop, then painted with a thin glaze of a soy-honey mixture, was just irresistible. (If I were an award committee, I’d give it “best of the year.”)
As irresistible, for me, was the opportunity to ask J. G. how to make the thing simpler; he knows full well that the subtle differences he’s employed to make this dish near-perfect can be compromised with still-terrific results.
One thing you can’t mess with is the rice itself: perfectly seasoned sushi rice, made simpler by adding the fairly standard seasonings of konbu (kelp), mirin, salt and vinegar before the cooking instead of after. It’s then fried, and this is the genius of the dish; it becomes a sweet rectangle of sticky crunch surrounding a sweet, tender interior. (You could probably sell it at a fast-food place with ketchup and get rich.)
But everything else (and this is per Jean-Georges, not me) is pretty much fair game. The chipotle mayonnaise is spectacular, and making mayonnaise from scratch is simple. (So simple that an essentially noncooking friend of mine, after attending one of the mayonnaise-based picnics I wrote about this summer, is now a homemade-mayonnaise fiend.)
This mayonnaise, seeking that marginal improvement, contains two kinds of oil and three sources of acidity. But there is an alternative: Jean-Georges said that when he made this dish at home, he laced bottled mayonnaise with sriracha and was happy. (I spiked my Hellmann’s with pimentón, or smoked paprika, and a pinch of cayenne, and thought that wasn’t bad.)
Similarly, I noted that the role of the soy-honey-vinegar mixture was so subtle, and played such a small part in the overall picture, that it might be played by plain, high-quality soy sauce; the chef agreed.
But the scallops are the big thing; one of the reasons this dish is so terrific is that the scallops Jean-Georges uses are live and in the shell just before they’re sliced and layered on the fried rice cakes. Few people, myself included, are going to do this at home, or even have the option of doing this at home. What else works, I asked him?
Well, basically, anything you’d use for sushi: avocado, which is incredible. Good salmon (if you can find it) or tuna — or almost any other fish for that matter. Cucumber, whose cool crunch adds a different dimension. And so on.
These are not “lesser” versions. They’re just the kinds of things nonchefs or chefs cooking at home do when they don’t have every possible advantage.


RECIPE

Jean-Georges Vongerichten’s Fried Sushi Cakes With Scallops, Honey Soy Sauce and Chipotle Mayonnaise

TOTAL TIME
About an hour, plus resting time

FOR THE RICE CAKES

  • 1 and 1/2 cups short-grain sushi rice
  • 2 tablespoons mirin
  • 1 and 1/2 tablespoons rice-wine vinegar
  • 2-inch piece konbu
  • 1 tablespoon salt.

FOR THE CHIPOTLE MAYONNAISE

  • 1 egg yolk
  • 1 teaspoon red-wine vinegar
  • 1 and 1/2 teaspoons orange juice
  • 2 teaspoons lime juice
  • 1 tablespoon chipotle in adobo, including some of the liquid
  • 1 teaspoon salt
  • 3/4 cup grapeseed oil
  • 1/4 cup olive oil.

FOR THE HONEY SOY SAUCE

  • 1/2 cup light soy sauce
  • 1/2 cup honey
  • 2 tablespoons sherry vinegar
  • 1 tablespoon rice-wine vinegar.

FOR FRYING AND ASSEMBLING

  • Grapeseed oil
  • Coarse salt
  • Minced scallions
  • 6 big scallops, each sliced into 4 pieces
  • Minced cilantro.

PREPARATION

1.
Combine sushi rice, mirin, rice-wine vinegar, konbu and 1 tablespoon salt in a medium saucepan with 3 cups of water and bring to a boil. Cover with a lid wrapped in a damp cloth and reduce to a simmer. Cook for 20 minutes or until done. (Alternatively, use a rice cooker.) Remove from the heat and let sit for 15 minutes.
2.
Line an 8-by-8-inch baking dish with plastic wrap. Firmly press the rice into the pan. Refrigerate until set, preferably overnight. Remove the rice from the pan and, using a chef’s knife dipped in hot water to prevent sticking, cut into 1-by-3-inch rectangles.
3.
Make the chipotle mayonnaise: Combine the egg yoke, red-wine vinegar, orange juice, lime juice, adobo and liquid and 1 teaspoon salt and purée in a food processor or blender. Add the 3/4 cup grapeseed oil and the olive oil in a drizzle and process until smooth, thick and creamy.
4.
Make the honey soy sauce: In a small saucepan, bring the soy sauce, honey, sherry vinegar and 1 tablespoon rice-wine vinegar to a boil and stir until smooth. Cool before using.
5.
Heat grapeseed oil in a pan, deep enough to just about cover the rectangles. A broad skillet will require more oil than a deep saucepan, but will allow you to cook more pieces at once. Allow oil temperature to reach 350 to 360 degrees. Cook the rice rectangles until golden and crispy, about 5 minutes total, turning once; transfer to paper towels and season with salt
6.
Combine chipotle mayonnaise and scallions. Top each rectangle with a bit of the mayonnaise, then drape with a piece of raw scallop. Brush or drizzle with honey soy, then garnish with a bit of cilantro and a tiny pinch of salt.
YIELD
24 cakes, 6 to 12 servings.

Friday, September 14, 2012

Korean Fried Chicken


Source

http://norecipes.com/blog/korean-fried-chicken-recipe/


Korean Fried Chicken (Yangnyeom Chikin)

Korean Fried Chicken
  • YIELD: 4 Servings
  • PREP: 10 mins
  • COOK: 30 mins
  • READY IN: 40 mins
Crackly skinned Korean Fried Chicken (양념치킨) with a fiery sweet glaze.

Ingredients

Instructions

  1. Sprinkle the salt over the chicken wings, cover with plastic wrap and leave them in the fridge for 24 hours. This not only seasons the chicken, it draws out extra moisture from the surface of the chicken making it easier to crisp. 
    Salted Chicken for Korean Fried Chicken
  2. To make the sauce, combine brown sugar, soy sauce, gochujang, soju, garlic, ginger and sesame oil in a pan and boil until it starts to get syrupy. Taste the sauce and add gochugaru until it's the spiciness you want it. Strain the sauce through a fine mesh sieve to remove the solids. This is important as the solids will tend to clump on the surface of the chicken causing the skin to lose its crispness. 
    Sauce for Korean Fried Chicken
  3. Add about 2" of vegetable oil to a heavy bottomed pot and heat to 320 degrees F (160C). 
  4. Take the chicken out of the fridge and use paper towels to remove as much moisture from the surface of the chicken as possible. It's important that you get the chicken very dry as it will spatter in the hot oil making a mess, and the skin won't crisp up as nicely. 
  5. Sprinkle on the potato starch, and toss the chicken to evenly coat each piece with a thin layer of starch. 
  6. Fry the chicken wings for 10 minutes in batches. You can actually cram quite a few wings in, as long as they are fully submerged. Transfer to a plate and continue frying the rest of the wings. 
    Fried chicken after the first fry
  7. Increase the heat of the oil to 375 degrees F (190C). Fry the chicken again until the wings are golden brown (about 2-3 minutes). 
    Korean Fried Chicken frying in oil
  8. Transfer the wings directly to the bowl of glaze and quickly toss to coat lightly with the glaze. Transfer immediately to a serving platter. If they sit in the sauce too long they will soak up too much liquid and loose their crispness. 
    Korean Fried Chicken in Sauce

Cornflakes baked chicken


http://mykitchenantics.blogspot.co.uk/
Cornflake crusted chicken and announcing the World's Biggest Coffee Morning


IMG_1688
I have exhausted almost everything from my drafts and this was a recipe I hadn't planned on posting, not because the recipe was a failure, but because I wasn't too happy with the pictures. Since I hadn't fed my blog in a while, I thought, why not, lets get it out there. 

My last set of guests have left and I must say its awfully quiet around here. No rushing between houses, no early morning sightseeing and no travelling in the car (which I dread completely. Hail the London Underground). I haven't cooked in a reaaaallly long time and as always, its a slow start. Even with taking pics and stuff, I haven't really got down to it and I hope it wont be long before I'm up and about with the camera and props.
IMG_1703 
Anyways, this cornflake crusted chicken was the after effect of a cornflake over dose, more like, I want to finish it off as soon as possible so I have to think of recipes to use them in. So dinner on one night was taken care of with these crispy, crunchy chicken which I served with a healthy salad. I still had some more remaining which I force fed my sister-in-law when she stayed with us for a month :) :)

Its an easy peacy recipe and quite tasty for a picnic and such. It wont go soggy on you if you store it in an air tight container. I even used up the boneless crusted pieces of chicken in a sandwich the next day and it was just as good. So go on, try it and I'm sure you'll thank me later. Don't judge the recipe by the pics, it was waaaay better tasting than it looks :)

Recipe adapted from here
IMG_1658 
Chicken- 1/2 kg (mix of drumsticks and thighs, cut into large pieces)
Buttermilk- 300ml
Cumin powder- 1 tsp
Kashmiri chilli powder- 1 tsp
Spicy chilly powder- 1 tsp (paprika)
Black pepper powder- 1/2 tsp
Garlic powder- 1 tsp
Salt- to taste
Cornflakes- 3 cups (crushed using a rolling pin. Don't powder it)
Parmesan cheese- 3 tbsp (grated)
Salt and pepper- to season
IMG_1679
Whisk together the buttermilk with cumin, chilli powders, pepper, garlic and salt. 
Place the chicken pieces in a non reactive bowl and pour the marinade over. Mix well and keep it covered in a refrigerator for a minimum of 3 hours or overnight.
When ready to cook, pre heat the oven to 220C.
Place a wire rack over a baking tray and keep aside. You can place a sheet of foil on the baking tray to catch any juices or crumbs falling off the chicken. Less cleaning that way :)
Season the crushed cornflakes with the Parmesan and salt and pepper. Mix well and keep ready in a shallow bowl.
Shake off the excess marinade from the chicken, keeping some on for the cornflakes to stick and then roll the pieces in the crumb mix properly, making sure they are completely coated.
Place on the wire rack and into the oven. 
Bake for about 25 minutes, making sure you check the chicken pieces every 10 minutes and turning them around if required. They should not brown too much.
To check if its done, slice through to the bone and if the juices run clear, and the meat is not pink, you are good to go.
Take out of the oven and serve when still hot.

Notes: You can basically add any spice of choice and then coat the chicken with cornflakes.
To get a much crispier version, place under the broiler towards the end. Again, make sure you don't burn it.

Sri Lanka curry egg


source http://mykitchenantics.blogspot.co.uk/
Sri Lankan egg curry


IMG_3310
How are you all doing??? Embracing the last few days of summer? Well, I am and I think I'm now ready to let go and welcome gloomy, chilly days and sweaters and pull overs. Last week was depressing with rains and winds and gloomy weather and I almost got out my night socks. Good thing I didn't because for the last 4 days we have been having brilliant weather, warm and sunny and still summer like.

Since I am still getting into the groove of cooking and stuff, it is an effort to make dinner. I am still exhausting stuff from my freezer and realised if I didn't start cooking soon I'd just get used to it and even worse ignore my blog and photography and such. So last week when we were a bit under the weather (literally) I brought out this new cook book called Serendip by Peter Kuruvita which has an array of Sri Lankan recipes and some gorgeous gorgeous photographs.

This is my current fav book and I have already tried out a couple of recipes which have all been fruitful. Usually my first trial at new recipes are always a failure and it very rarely tempts me to make them again, but this one somehow has managed to hit the spot and I have so so so many awesome recipes to try from the book. The book costs quite a bit and if I didn't use it as much as I promised Ro, I am never gonna hear the end of it. So for the past couple of days anything on the dinner table is Sri Lankan in nature. (I plan on doing it till Ro tells me, enough with it already!!!)
IMG_3252 
Truth be told, the picture of this egg curry tempted me more than the recipe. The fact that I'm impulsive doesn't really work always. I had already put the eggs to boil and then decided to go through the recipe which is when I realised it had 3 ingredients I hadn't even heard of and wondered, what now??? I still decided to go ahead with the recipe, omitting the two and it still was a welcome change to the usual Kerala egg curry. Very few ingredients are used and seriously, how can anything with coconut milk ever taste bad??? 

I had picked up some frozen idiyappams from the Indian store a while back and served it along with the curry. It was a brilliant combo and I'm kicking myself for not picking up a few more packs. Ro was quite thrilled to see them and asked where I got it from to which I pretended to be insulted and said what do you mean, I slogged it out in the kitchen and made them from scratch. How did you do the strings without the press was his next question. I avoided it saying there was a technique I'd learnt on youtube which I shall explain later and he bought that. And then just when we were about to eat I opened my big mouth and said, 'hey just check if the idiyappams have been cooked through, it was frozen.' Ro who usually doesn't listen to crap I say, picked this one up immediately. I will be teased about it for quite a while. Dammit!! :)

Recipe adapted from Serendip: My Sri Lankan Kitchen by Peter Kuruvita
IMG_3275 
Eggs- 4, plunged into boiling water for 5 minutes and then refreshed in cold water.
Oil- 1 tbsp + enough to shallow fry the eggs
Cumin seeds- 1/2 tsp
Cinnamon stick- 1 inch piece
Onion- 1 medium, thinly sliced
Green chillies- 2 small, slit lengthwise
Curry leaves- a sprig
Chilli powder- 1 tsp
Turmeric powder- 1/4 tsp
Maldive fish flakes - 1/2 tbsp
Pandanus leaf- 1 inch piece
Dill seeds- 1/4 tsp
Coconut milk- 1 cup
Salt- to taste
IMG_3239-1 
Peel the cooked eggs, prick them all over with a fork and lightly salt them.
Heat enough oil in a pan and fry the eggs until golden, flipping sides as and when required. Drain on paper towels and keep ready.
Into a wok, tip in all the other ingredients and simmer for about 8 to 10 minutes or till the onions have become soft and the sauce has slightly thickened.
Add the eggs and continue to cook for 5 more minutes.
Season with enough salt, give a final stir and take it off the fire.
Serve with appam, idiyappam, roti or even bread.
IMG_3288 
Notes: I didn't have the fish flakes, pandanus leaf and the dill seeds which I presume were the main ingredients that gave the curry its distinct taste.
I also sautéed the onions with cumin, cinnamon, chillies and the powders till the onions grew soft and then added the coconut milk and let it simmer for about 5 to 6 minutes.
Although I'd pricked the eggs with a fork, I found that the masalas hadn't caught on to it. So next time I would halve the egg and throw it into the curry.
The base curry is perfect for a fish molee and even vegetable curries. 

Monday, September 3, 2012

Wonton noodle soup

Source
http://norecipes.com/blog/wonton-soup-recipe/


Instead of making the wonton, how about if i simply sautee the wonton filling?

there are also tips on making the broth

Saturday, August 18, 2012

mussels in white wine

http://kitchenetteblog.com/2012/08/mussels-in-white-wine/


mussels in white wine
On Wednesday we celebrated what would’ve been the 100th birthday of one of my biggest inspirations in both food and life: Julia Child!
As a kid, I’d watch her shows less for the cooking instruction – as I was still in the Easy Bake Oven stage – but just because I found her fascinating and hilarious.
Once I was able to reach the counter tops, her fearlessness and honesty taught me that there’s nothing to fear in the kitchen. You’re going to mess up, it’s going to be OK – you’ll learn from that mistake and be a better cook because of it.
mussels in white wine
Whether it’s as simple as steaming mussels or as fancy as croquembouche, she believed in making food the right way – from scratch, using real ingredients.
And as she stated in one of my favorite books, My Life in France, “…nothing is too much trouble if it turns out the way it should.”
And making these mussels was really no trouble at all!
There is a bit of prep involved, but it happens to be the kind I find quite relaxing. I’ll go over it in case you aren’t familiar with preparing mussels.
First, you’ll want to put the mussels over ice to make sure they stay cold while you’re working. Now the inspection and cleaning phase begins!
A good mussel in one that’s closed tightly and not cracked or chipped in any way. If you come across one that’s open, give it a good tap against the counter. If it closes immediately, it’s still alive and good to go – if not, it’s already dead, throw it away!
cleaning mussels
Scrub the mussels with a brush to remove any sand, and if what they call the “beard” is present you’ll want to yank that out (see photo above).
Once cleaned, drop those dudes in your prepared soaking water (I’ll go over that in the recipe) and have a glass of wine with a friend!
celebrating julia child!
You don’t necessarily have the dress up like Julia, but I feel it helps.
Also I think I need to have a kitchen towel affixed to my waist at all times. So useful!
mussels in white wine
Once you’ve done the prep, you’re 90% of the way there! Throw those beauties in a pot with some shallots, butter and wine, and go to town!

mussels in white wine

This recipe is delicious as is, but there are tons of ingredients you could add to boost the flavor even more! Garlic, fresh tomatoes, red pepper flakes, different herbs... get crazy!
Serves: 3-4

ingredients

  • ~2 pounds fresh mussels, scrubbed & debearded (see post for instructions)
  • 1/3 cup cornmeal or flour
  • 3 tablespoons butter
  • 1/4 cup minced shallots
  • 1 1/4 cups dry white wine
  • 4 sprigs fresh parsley
  • 3 sprigs fresh thyme
  • 1/2 small bay leaf
  • freshly ground black pepper
  • zest of 1 lemon
  • 1/4 cup roughly chopped parsley
  • French bread, for dipping

method

  • In a very large bowl, whisk together 10 cups cold water with the cornmeal or flour. Soak the cleaned mussels in this mixture for at least half an hour, or up to 2 hours. This will allow the mussels to disgorge their sand, while the cornmeal is supposed to help them become more plump. Lift the mussels out of the bowl and into a colander for a thorough rinse.
  • In a large pot, melt the butter over medium heat. Add the shallots and cook until translucent. Add the wine, parsley & thyme sprigs, bay leaf and pepper; bring to a boil over high heat. Cook for 2-3 minutes, until it reduces slightly.
  • Add the mussels to the pot and cover tightly. As Julia instructs, you'll want to frequently hold the lid tightly and, "...toss the mussels with an up and down slightly jerky motion so the mussels will change levels and cook evenly." Don't you just love her?
  • After 4-5 minutes, the shells will have opened. Remove them from the heat, add the lemon zest and stir. Serve the mussels topped with the extra liquid from the pot and chopped parsley. And don't forget the French bread!

Thursday, August 16, 2012

swedish meatball


http://iamafoodblog.com/ikea-swedish-meatball-recipe/
IKEA SWEDISH MEATBALL RECIPEslightly adapted from ikea-friends.com
yield: 16 large meatballs
  • 1/2 pound ground beef
    1/2 pound ground pork
    1 egg
    2.5 tablespoons finely chopped onion
    1/2 cup breadcrumbs (I used panko)
    2 small potatoes
    3 tablespoons butter
    salt and white pepper
    1/4 teaspoon all spice
Peel and cut the potatoes into chunks. Place in a small pot, cover with water and bring to a boil. Cook the potatoes until fork tender and drain well. You can mash the potatoes at this point, or if you have a potato ricer, use the potato ricer for fluffy potato grains. Set aside until completely cool.
In a frying pan, melt a tablespoon of butter over medium heat and brown the onions. Remove and set aside.
Mix all the ingredients until homogenous and flavour generously with salt, white pepper and the all spice. Shape the meat into balls.
In a large, non-stick frying pan, heat up the remaining butter over medium heat. Fry the meatballs slowly,  turning when needed, until a golden-brown crust forms and the meatball is cooked throughout.

swedish meatball


http://www.simplyrecipes.com/recipes/swedish_meatballs/


Swedish Meatballs Recipe

Lingonberry jelly is traditionally used with Swedish meatballs; you can substitute cranberry, red currant or raspberry jelly if you can't find lingonberry jelly.

INGREDIENTS

Meatballs:
  • 1 large yellow or white onion, peeled, grated (through a cheese grater)
  • 2 Tbsp butter
  • 2/3 cup milk
  • 4-5 slices of bread, crusts removed, bread cut into pieces
  • 2 eggs
  • 1 pound ground pork
  • 1 1/2 pounds ground beef
  • 2 teaspoons salt
  • 1 teaspoon freshly ground nutmeg
  • 1 teaspoon ground cardamom
  • 2 teaspoons black pepper
Sauce:
  • 6 Tbsp butter
  • 1/3 cup flour
  • 1 quart beef stock
  • 1/2 to 3/4 cup sour cream
  • Salt
  • 2 to 4 Tbsp of Lingonberry, cranberry, red currant or raspberry jelly, more or less to taste (optional)

METHOD

1 Sauté the grated onion in the butter over medium-high heat until the onions soften and turn translucent, about 3-4 minutes. Remove from heat and let cool.
2 In a medium bowl, mix the bread pieces with the milk. Set aside for 15-20 minutes, or until the bread soaks up all the milk. When it does, pulverize the bread in a food processor and pour it into a large bowl.
3 Add the cooled onions to the bowl of milk and bread. Add the rest of the meatball ingredients—eggs, ground pork, ground beef, salt, nutmeg, cardamom, pepper. Using your (clean) hands, mix well for about 2 minutes until the ingredients are well combined.
4 Use a tablespoon to measure out the meat for the meatballs. As you form the meatballs, set each one aside on a sheet pan or plate. You should get 40 to 50 meatballs.
swedish-meatballs-1.jpgswedish-meatballs-2.jpg
5 Heat 6 tablespoons of butter for the sauce in a large sauté pan over medium heat. When the butter has melted, reduce the heat to medium and add some of the meatballs. Do not crowd the pan. Work in batches, browning them slowly on all sides. Be gentle when you turn them so they don't break apart. Do not cook the meatballs all the way through, only brown them at this stage. Once browned, use a slotted spoon to remove them from the pan, setting them aside so you can make the sauce with the remaining pan butter.
swedish-meatballs-3.jpgswedish-meatballs-4.jpg
6 Start the sauce. (Check the pan butter to see if it has burned. If the butter tastes burnt, discard the butter and replace with new 6 tablespoons.) Heat the pan butter on medium until hot. Slowly whisk in the flour. Stirring often, let the flour cook until it is the color of coffee-with-cream; this is a classic roux.
swedish-meatballs-5.jpgswedish-meatballs-6.jpg
7 As the roux is cooking, heat the beef stock in another pot until it simmers. When the roux has cooked until the color of coffee-with-cream, slowly add the hot beef stock a little at a time. Everything will sputter at first, and the sauce will seize up and solidify. Keep stirring and adding stock slowly, and it will loosen up and become silky.
swedish-meatballs-7.jpg
8 Add the meatballs to the sauce and turn the heat down to low. Cover the pot and cook on low heat for 10 minutes. You might need to do this in batches.
9 To finish, move the meatballs to a serving dish. Add the sour cream and mix well. Either add the lingonberry jelly to the sauce or serve it on the side.

Wednesday, August 15, 2012