This is a place where I collect and archive recipes from all over the place. These recipes were picked because these are food that I love to eat. I copied the recipes from other sources and I have included the links to each source.

I have cooked some of these dishes and I would be happy to discuss my story with you. Feel free to email me at scientistcooks@gmail.com or check out my food blog www.foodmolecule.blogspot.com

Thursday, June 21, 2012

BOURBON CHOCOLATE BREAD PUDDING


Serves 6

2 cups whole milk
eggs
1/3 cup bourbon
4 cups day-old French bread cubes (packed)
1/2 cup turbinado sugar
  1. Preheat oven to 350.
  2. Whisk together milk, eggs, and bourbon. In a large bowl, combine the liquids with the chocolate, bread cubes, and sugar. Toss to coat and set aside to soak for about 45 minutes. Gently stir once or twice while soaking.
  3. Pour mixture into a 1.5 quart baking dish. Bake for about 40 minutes or until the custard has set and the top of the pudding is slightly crispy (be careful not to overcook). Serve warm or at warm temperature.

CARAMEL RICE PUDDING WITH BROWN BUTTER AND CREME FRAICHE


Serves 6 to 8

2 tablespoons unsalted butter
1/4 cup plus 3 tablespoons sugar
6 cups whole milk
seeds from 1/2 a vanilla bean
1/4 teaspoon sea salt
3/4 cups arborio rice
  1. Put the butter in a 3 quart heavy saucepan over medium heat. Once the butter stops foaming, and you see orangey brown specks start to appear, stir gently with a wooden spoon. After a minute or two, when the specks are nut brown and the butter smells nice and toasty, sprinkle ¼ cup of sugar over the butter and stir to combine. (It will clump up a little, but don’t worry!)
  2. Switch to a whisk, and cook the butter and sugar, whisking all the time, until the sugar has melted and the mixture becomes a smooth, rich brown caramel, about 5 minutes. (Early on, the butter and sugar will separate, and the butter will pool around the edges of the sugar, but never fear! Once the sugar has fully melted, the two will start to come together again, and you’ll have a nice smooth caramel.)
  3. When the caramel is a rich nut brown and starts to smoke, remove the pan from the heat and quickly and carefully whisk in the crème fraiche and about 1/2 a cup of the milk. Don’t worry if the mixture bubbles up when you do this – it’ll settle down again quickly. (This step cools off the caramel and keeps it from cooking further.) Return the pan to the heat and whisk in the rest of the milk, the remaining 3 tablespoons of sugar, the vanilla seeds and the salt. If the caramel seizes a little, just keep whisking until the mixture becomes smooth again.
  4. Switch back to the wooden spoon and stir in the rice. Turn up the heat and bring the mixture to a boil. Reduce the heat so that the milk is simmering steadily and cook the rice pudding uncovered for about 25 minutes, stirring frequently to make sure nothing sticks to the bottom of the pan, especially towards the end. The rice should be tender but not mushy, and the pudding should thicken but still be quite loose – remember that it will thicken a lot more while it’s cooling. Transfer the pudding to a container, cover and refrigerate until cold. Serve in individual bowls with a dollop of crème fraiche.

CHocolate pudding


Serves 3 to 4

3 tablespoons tapioca flour
1/4 cup plus 1 teaspoon sugar
1/2 cup heavy cream
1 cup whole milk
1/2 teaspoon fine sea salt
1/2 teaspoon vanilla extract
6 ounces 66% cacao dark chocolate, chopped
  1. Put the egg yolks and tapioca flour in a blender and blend on low speed until a light-colored paste forms.
  2. Combine the sugar, cream, milk, salt, and vanilla in a saucepan set over medium heat. Bring the mixture to a boil, then remove it from the heat. Turn the blender containing the egg and tapioca mixture back on low. Quickly and carefully, pour the hot milk mixture into the blender and increase the speed to medium. The heat will cook the egg yolks and allow the tapioca to thicken to the consistency of thick mayonnaise.
  3. With the blender running, add the chocolate in stages so it is emulsified into the pudding. When all the chocolate is added, strain the pudding into a serving bowl (or 3 to 4 serving bowls) and let it cool to room temperature before transferring to the refrigerator to cool completely. Top with whipped cream if you like.

Lemon Posset


http://food52.com/recipes/3060_lemon_posset

Serves 4

2 cups heavy cream
2/3 cups granulated sugar
5 tablespoons lemon juice
  1. In a small saucepan, heat cream and sugar to boiling, stirring to dissolve sugar. Continue boiling for 5 minutes. Watch the heat - don’t let the cream boil over.
  2. Remove pan from heat and stir in lemon juice. Let cool, about 15 minutes.
  3. Pour even amounts into four ramekins. Refrigerate at least 2 hours, or until set.
  4. Serve with unsweetened whipped cream, or shortbread cookies to dunk.

Burnt Caramel Pudding


http://food52.com/recipes/9628_burnt_caramel_pudding


Serves 4

  1. Heat the oven to 300 degrees F.
  2. Pour the cream into a small saucepan. Split vanilla bean and scrape the seeds into the cream; toss the scraped pod in there too. Turn the heat to low to gently warm the cream.
  3. Reserve 2 tablespoons of the sugar; pour remaining sugar and 1 1/2 tablespoons water into heavy-bottomed saucepan and set over medium heat, stirring until sugar dissolves. Then crank the heat to high and let the liquid bubble away -- don’t stir; just swirl the pan occasionally -- until it turns dark amber. This takes about 4 minutes, but watch closely because it happens fast.
  4. Moving quickly, fish the vanilla pod out of the cream and save for another use. Slowly stir the warm cream into the caramel over medium heat. Once it comes to a boil (it will fast), turn off the heat and let the mixture cool for about 10 minutes.
  5. Meanwhile, whisk the egg yolks with the remaining sugar and a pinch of salt in a medium bowl. Whisk a little of the cream/caramel mixture into the egg yolks. Gradually add the rest, until it's all incorporated.
  6. Strain the mixture into a pitcher or large measuring cup and pour into four ramekins. Place the ramekins in a shallow pan half filled with cold water. If you like your caramel a bit salty like me, sprinkle a few extra grains of sea salt on top of each one. Cook at 300 degrees for about an hour to an hour and 15 minutes. Chill for at least 3 hours, but it's best if you can chill it overnight. Serve with whipped heavy cream.

Chocolate bundt cake

Lemon Tart


http://food52.com/recipes/1374_lazy_marys_lemon_tart


Serves 1 tart

1 large meyer lemon cut into 8 pieces
1 1/2 cup superfine suger
your favorite tart shell
  1. Put all ingredients (except tart shell) into a blender and whirl like crazy!
  2. Pour into tart shell.
  3. Bake 40 minutes at 350 degrees (watch that the top does not burn).

Wednesday, June 20, 2012

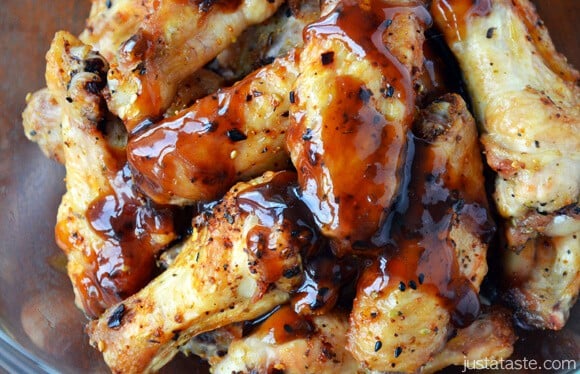
Crispy Baked Asian Chicken Wings


http://www.justataste.com/2012/06/crispy-baked-asian-chicken-wings-with-hoisin-glaze/


Crispy Baked Asian Chicken Wings

Crispy Baked Asian Chicken Wings
There are few occasions when I’d argue that “baked” rules over “deep-fried.” But believe it or not, a piping hot oven—and not a vat of bubbling oil—is the secret to the crispiest, crackliest chicken wings. And with just five ingredients and 50 minutes, you’ll be licking your fingers clean for every last taste of these Crispy Baked Asian Chicken Wings.
I consider myself a bit of a wing connoisseur. Buffalo, chipotle, teriyaki, barbecue—you name it, I’ve winged it. While it’s hard to beat basic butter and hot sauce, I’ve turned to my favorite hoisin and blackberry jam glaze (of mini-meatball fame) to add a sweet and tangy twist to each crunchy bite. I guarantee these wings will fly off the plate. (You had to know that was coming…)
Crispy Baked Asian Chicken Wings
Craving more? Sign up for the Just a Taste newsletter for a second fresh serving of content delivered straight to your inbox each week! And stay in touch on Facebook and Twitter for all of the latest updates.

Crispy Baked Asian Chicken Wings

Yield: 4 servings
Prep Time: 10 min
Cook Time: 50 min

Ingredients:

2½ pounds chicken wings, tips removed, drumettes and flats separated
1 Tablespoon vegetable oil
1 Tablespoon Chinese 5-Spice or other Asian spice blend (See Kelly's Notes)
1/3 cup hoisin sauce
¼ cup blackberry jam

Directions:

Preheat oven to 400ºF.
Rinse wings and drumettes and pat dry. Transfer to a large bowl and toss with vegetable oil and spice blend until well coated. Position wings on baking racks in a single layer ensuring that wings aren't touching.
Bake, rotating pan half-way through, until fully cooked, 45 to 50 minutes. Remove wings from oven and transfer to a large bowl.
Whisk together hoisin and blackberry jam in a small saucepot over medium-low heat until warm.
Drizzle wings with sauce, tossing until well coated. Serve immediately.
Kelly's Notes:
I stumbled upon McCormick's Far East Sesame Ginger Blend and it has become my go-to for seasoning chicken, pork and beef. Look for it (or a similar blend) in the spice section of your grocery store.

Chorizo and Cheddar Potato Skins


http://www.justataste.com/2012/06/chorizo-and-cheddar-potato-skins/


Chorizo and Cheddar Potato Skins

Chorizo and Cheddar Potato Skins
A few weeks ago in my newsletter, I shared Ten Ways to Add Chorizo to Any Meal. Meet lucky number 11: Chorizo and Cheddar Potato Skins.
Potato skins are a food you might bypass making at home, especially given their more famous sister spud—the rich and creamy twice-baked potato. But if crispy, crunchy, and oozing with chorizo and cheese is your thing, then look no further than these no-fuss skins as your new go-to appetizer or anytime snack.
I’ve left the door wide open for customization. Pick your level of heat when it comes to mild versus spicy chorizo, and feel free to sub Monterey jack for cheddar. And now, let the scooping and stuffing begin!
Potato Skins
Potato Skins
Sauteed Chorizo
Chorizo and Cheddar Potato Skins
Craving more? Sign up for the Just a Taste newsletter for a second fresh serving of content delivered straight to your inbox each week! And stay in touch on Facebook and Twitter for all of the latest updates.

Chorizo and Cheddar Potato Skins

Yield: 16 potato skins
Prep Time: 30 min
Cook Time: 1 hr 10 min

Ingredients:

8 russet potatoes, scrubbed and dried
2 Tablespoons unsalted butter, melted
1 pound raw chorizo, casing removed
2 cups shredded cheddar cheese
Sour cream, for garnish
Chopped scallions, green parts only, for garnish

Directions:

Preheat oven to 400ºF.
Pierce potatoes several times with fork then place them directly on the oven rack and bake them for about 50 minutes, or until they’re easily pierced with a knife.
Remove the potatoes from the oven and transfer them to a rack to cool. Set the oven to broil.
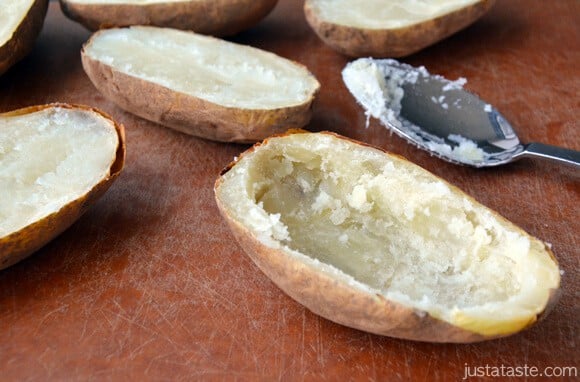
Once the potatoes are cool enough to handle, slice them in half length-wise and use a spoon to scoop out the flesh, leaving about a 1/4-inch ring around each potato. (Reserve flesh for another use, such as gnocchi or mashed potatoes.)
Brush both sides of the potato skins with melted butter and season with salt and pepper. Position the skins, skin side up, on a cookie sheet. Broil for 2 minutes, flip, then broil an additional 2 minutes. (Watch the skins carefully to ensure they don’t burn.) Remove the skins from the oven.
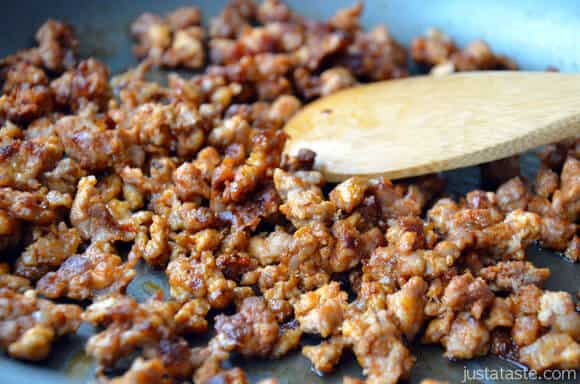
Sauté the chorizo in a large, non-stick frying pan set over medium-low heat, using a wooden spatula or spoon to break it up into smaller pieces, for about 10 minutes or until it’s fully cooked. Use a slotted spoon to portion out the cooked chorizo into the prepared potato skins. Top each potato skin with 2 tablespoons cheese and broil for 4 to 5 minutes, or until the cheese has fully melted.
Remove the potato skins from the oven and garnish with sour cream and chopped chives. Serve immediately.
Recipe technique adapted from Chow.

Monday, June 11, 2012

Vietnamese Coffee

Trung Nguyen Brand

Cafe du monde

coffee with chicory


Banh Mi

From rasa malaysia

print
Banh Mi with Lemongrass Pork Recipe (Banh Mi Thit Noung)
Serves 4 | Prep Time: 30 Minutes | Cook Time: 10 Minutes
Ingredients:
2 lbs boneless pork butt
(cut into 1/4-inch thick slices, 8-inch length by 2 1/2-inch width)
4-6 8-inch baguette rolls, sliced lengthwise in the center
1/2 bunch cilantro leaves
5 Jalapeno chilies, deseeded and thinly sliced
Pickled carrots and daikon (store-bought or homemade)
Mayonnaise
Lemongrass Pork Marinade:
1/2 cup minced lemongrass
1/2 cup sugar
3 tablespoons fish sauce
1 1/2 tablespoons ground black pepper
5 shallots, peeled and minced
3 cloves garlic, peeled and minced
2 tablespoons roasted sesame oil
2 tablespoons peanut oil/regular cooking oil
2 tablespoons sweet soy sauce
Method:
Lightly pound the pork slices with a mallet/back of the kitchen knife. In a bowl, mix all the Marinade ingredients well. Put in the pork slices and marinade for about 1-2 hours/overnight. Discard excess marinade before use.
Preheat grill until ready to use. Gently arrange marinated pork slices onto the grill. Grill until the pork is nicely charred on both sides and meat is thoroughly cooked. If use indoor broiler oven, broil for 5-7 minutes on each side or until the meat is completely cooked and nicely charred.
Remove lemongrass pork from grill and assemble the baguettes with mayonnaise spread, and then put the sliced Jalapeno chilies, a slice of grilled lemongrass pork, and finish off with a handful of pickled carrots and daikon and cilantro leaves. Serve a whole baguette or cut the baguette into half.
Cook’s Note:
I used the store-bought picked carrots and daikon. To make it from scratch, check out Viet World Kitchen.

Pickle

Asian fast pickles
Cooks in Asia don’t can the way westerners do using sterilized jars and the like. We eat pickles and preserved vegetables so often – think of Korean kimchi sold in the refrigerated sections of many markets these days and the assortment of Japanese pickles – that it’s more practical to make regular supplies and keep them in the refrigerator, where they last for weeks and sometimes months. This Vietnamese daikon and carrot pickle is sold in bulk at Vietnamese-American markets (check the produce section) and in Vietnam, sold by wet market vendors in small plastic bags. I prefer to make my own and on a regular basis I replenish my ever dwindling supply of do chua.
How to buy daikon radish
Look for evenly shaped, firm, smooth, unblemished skin. I gravitate towards daikon radish that are no more than 2 inches in diameter because they tend to have a milder bite and wonderful sweetness. Really young daikon that are less than 1-inch thick are rather tasteless, and older fat daikon radish can be bitter hot. Farmers markets and Asian markets are a great place to score super duper fresh daikon.
How to deal with stinky pickled daikon 
If the daikon develops a strong/stinky odor in the jar, it has not gone bad. Before serving, open the jar and let it sit for 15 minutes to allow the smell to dissipate. Leave the room, if you must.

Daikon and Carrot Pickle

Do Chua (download pronunciation)
Try this daikon and carrot pickle recipe once and then tweak the recipe to your liking. Variations of the include adding tangy-sweet-pungent pickled shallots (cu kieu) to the mixture, as well as making heavier on the carrot side than the daikon side. I prefer to keep a higher ratio (say 2:1) of daikon to carrot as I like the mild bite of daikon radish. I like a tangy-sweet flavor whereas you can alter the ratio of sugar to vinegar to make the brine sweeter, and hence affect the pickle’s flavor.
Makes about 3 cups
1 large carrot, peeled and cut into thick matchsticks
1 pound daikons, each no larger than 2 inches in diameter, peeled and cut into thick matchsticks
1 teaspoon salt
2 teaspoons plus 1/2 cup sugar
1  1/4 cups distilled white vinegar
1 cup lukewarm water
1. Place the carrot and daikons in a bowl and sprinkle with the salt and 2 teaspoons of the sugar. Use your hands to knead the vegetables for about 3 minutes, expelling the water from them. They will soften and liquid will pool at the bottom of the bowl. Stop kneading when you can bend a piece of daikon so that the ends touch but the daikon does not break. The vegetables should have lost about one-fourth of their volume. Drain in a colander and rinse under cold running water, then press gently to expel extra water. Return the vegetables to the bowl if you plan to eat them soon, or transfer them to a 1-quart jar for longer storage.
2. To make the brine, in a bowl, combine the 1/2 cup sugar, the vinegar, and the water and stir to dissolve the sugar. Pour over the vegetables. The brine should cover the vegetables. Let the vegetables marinate in the brine for at least 1 hour before eating. They will keep in the refrigerator for up to 4 weeks. Beyond that point, they get tired.
Recipe from: Into the Vietnamese Kitchen: Treasured Foodways, Modern Flavors (2006, Ten Speed Press)