This is a place where I collect and archive recipes from all over the place. These recipes were picked because these are food that I love to eat. I copied the recipes from other sources and I have included the links to each source.

I have cooked some of these dishes and I would be happy to discuss my story with you. Feel free to email me at scientistcooks@gmail.com or check out my food blog www.foodmolecule.blogspot.com

Monday, March 26, 2012

Kaya

Subject: Re: kaya recipe
Ingredients for kaya

10 whole eggs
Sugar 500gms ( castor/ fine grain)
A tin of coconut cream ( 480 gms) - Thai brand
5 pcs of pandanus leaves( may use frozen ones)

Method
Prepare a pot of boiling water 3/4 full.
Whisk eggs together with sugar in a wok for about 5 mins.
Pour the can of coconut milk into a stainless steel container n warm  it in the boiling water for a few mins. Then leave aside.
Put the wok over the pot of boiling water making sure the wok is at least 2 inches above  the boiling water. Continue to stir the sugar n eggs mixture.
Once the sugar is melted, slowly pour in the warmed coconut milk n continue to stir until it thickens. Once the kaya sticks to the spoon it is done. About 30 mins.

Optional
If you want the kaya to look more brown. Take 2 tablespoonful of sugar and melt it in a a small
pot till it becomes caramel. Pour this caramel into the kaya n stir till it is well combined.
   Make sure the melted sugar is still in liquid form before you pour into the kaya.

Saturday, March 17, 2012

Homemade energy bars

from foodconfidence.com


{recipe} Homemade Energy Bars

by Danielle Omar on February 26, 2012
I’m a huge fan of energy bars.  I eat them quite a bit each week when I’m running around and need a quick snack.  I’m pretty particular about what I like — they must contain  peanut butter or some kind of nut and they can’t be too sweet.  I found this easy recipe for homemade bars from Averie over at Love Veggies and Yoga.  Hers are no-bake and vegan…but don’t let that stop you.  :-) In fact, after making these, you might not ever buy a bar again.
I love that you can add whatever you want to the mix to make these bars your own. For my next batch I’ll experiment with different flavors and textures, but for my first try I kept it pretty simple.  They only took  me 15 minutes to throw together,  below are the directions and some pictures.
Gather up all your ingredients and throw them in a bowl.
I did not do this, but I recommend you start with a layer of mashed banana, then add your ingredients. I skipped the banana and mine were a little crumbly.  So first, mash a banana into the bottom of the bowl, then layer in your ingredients.
I used:  
  • 1.5 cup McCain’s quick cooking oats
  • 1/2 cup unsweetened shredded coconut
  • 1/2 cup chopped unsweetened cherries and a handful of raisin mix (any dried fruit will work)
  • 1/2 cup chocolate chips
  • 1/2 cup maple syrup (or agave, honey)
  • 1/2 cup peanut butter (or any nut butter)
  • 2 tbsp ground flax seed
  • 2 tsp cinnamon
  • 2 tsp vanilla extract
After everything is mixed up, it will look something like this.  If it’s too dry (mine was a bit) you can add a little coconut oil or more maple syrup.
Transfer and press the mixture into a tupperware-type container.  Freeze for a few hours!
After a few hours, slice the semi-frozen mixture into whatever size you want.
 I wrapped them up individually and will store in the freezer.
 These bars are vegan, dairy free, gluten free (if you use GF oats), and have no artificial sweeteners.
You can beef up the protein level by adding protein powder to the mix or increase fiber by tossing in some oat bran.  You can also add chopped nuts or change the taste completely by experimenting with different nut butters.   The possibilities are endless!

Peking Pork Chop

Spotlight

Peking Pork Chops (京都排骨)

January 17th, 2012Recipes, Chinese New Year, Recipes, Chinese Recipes, Recipes51 Comments
Peking Pork Chops ( Jing Du Pork)
print Peking Pork Chops Recipe (Jing Du Pork/京都排骨)
Ingredients:
1 lb pork tenderloin or pork spare ribs, cut into 1/2-inch thick slices
Oil for deep frying
1 teaspoon toasted sesame seeds, optional
Marinade:
1 egg
1 tablespoon cornstarch
1/2 teaspoon Shaoxing wine
1/2 teaspoon salt
Sauce:
1 1/2 tablespoons tomato ketchup
1/2 tablespoon plum sauce
1/2 tablespoon chili sauce
1/4 teaspoon sweet bean sauce, or Hoisin sauce
1 tablespoon Worcestershire sauce
1 1/2 tablespoons black vinegar
1 1/2 tablespoons sugar
small pinch of Chinese Five Spice powder, optional
2 tablespoons water
Method:
1. Pound pork slices with mallet, or with the back of a kitchen knife until tender. Set aside. In a bowl, mix the Marinade ingredients, add in pork slices, mix well, and marinade for 30 minutes.
2. In a separate bowl, mix the Sauce ingredients. You may add more or less sugar, or other sauce ingredients to your own liking. Set sauce mixture aside.
3. Heat up a wok with enough oil, deep-fry pork slices for 5 minutes, or until color changes to golden brown and slightly crispy. Dish up, drain with paper towels and set aside.
4. Bring sauce to a quick boil, add deep-fried pork, and stir until all the meat is well coated with sauce. Dish up and sprinkle the pork chops with some toasted sesame seeds. Serve over a bowl of hot steamed rice.
Cook’s Note:
In the Chinese restaurants in the United States, 京都排骨 is made with pork tenderloin, which is exactly how I made this.

Ginger Scallion Beef

Rasa Malaysia

Ingredients:
8 oz beef flap meat, beef tenderloin or beef flank steak, sliced
2 1/2 tablespoons oil
1-inch ginger, peeled and thinly shredded
3 stalks scallions, cut into 2-inch lengths
2 tablespoons Sherry wine or Shaoxing wine
Marinade:
1 tablespoon oyster sauce
1 teaspoon Maggi seasoning
1 teaspoon cornstarch
1 teaspoon sesame oil
1 teaspoon sugar
1/2 teaspoon salt
2 dash of white pepper
Method:
1. Marinate sliced beef with all the Marinade ingredients and set aside for 5-10 minutes.
2. In a wok, heat up oil until very high heat, stir-fry shredded ginger, and scallions until fragrant.
3. Toss in beef slices and continue to stir-fry for 4 minutes, or until beef is nicely browned.
4. Add in cooking wine and briskly stir-fry for another 1 minute. Dish out and serve with steamed rice.

Golden Fragrant Clam

From Rasa Malaysia


Kam Heong Clams Recipe (Golden Fragrant Clams/Kam Heong Lala/金香拉拉)
Ingredients:
1 1/2 lbs Manila clams
1 teaspoon salt
3 tablespoons oil
2 sprigs of curry leaves, use only leaves
8-10 bird’s eye chilies, chopped or 5 Serrano chilies
1 tablespoon dried shrimp, soaked in water, drained and minced
8 shallots, lightly chopped or 1/2 a medium-sized onion
salt to taste (optional)
Seasoning Sauce:
1 tablespoon oyster sauce
1 teaspoon soybean paste
1 1/4 tablespoons curry powder
1 1/2 tablespoons Shaoxing wine
1 teaspoon sugar
Method:
1. Clean and scrub the shell of the clams thoroughly. Soak in salt water for 30 minutes, rinse in cold water and drained.
2. In a bowl, mix all the Seasoning ingredients, stir well and set aside.
3. Heat up oil in a wok. Stir-fry curry leaves, chilies and dried shrimp until fragrant. Add in chopped shallots and continue to stir-fry for 30 seconds.
4. Toss in the clams and Seasoning Sauce, and continue to stir-fry for 1 minute. Cover the wok and let the clams cook until they open up. Remove wok cover, give a quick stir, dish out and serve with steamed white rice.

Char Kuey Teow

From RasaMalaysia

Char Kuey Teow is one the most requested recipes on Rasa Malaysia. I have readers who’ve been begging me to post my Char Kuey Teow recipe since three years ago. Great things, especially a perfect recipe, is worth waiting for. Of course I’ve made Char Kuey Teow many times, but I wanted to share the ultimate Char Kuey Teow recipe, and this is it.
So, what are my secrets?
  1. Get the freshest ingredients—fresh and crunchy bean sprouts, freshly-made noodles, big, fat, succulent shrimp/prawn, bloody cockles (I love my Char Kuey Teow with them, without them, it’s not quite the same!), etc.
  2. Wonder why the prawn in Penang Char Kuey Teow are always so succulent, juicy, and sweet? I believe some of the most famous stalls treat their prawn with sugar and ice water, or perhaps they are just very fresh.
  3. Use lard if you can. That’s the secret for the rich silky taste.
  4. Very hot wok.
  5. Control your timing of cooking and hence control your “wok hei.”
The recipe is too long to post

http://rasamalaysia.com/char-kuey-teow/2/

Malaysia Grill Chicken

BBQ Chicken Wings Recipe (Jalan Alor Chicken Wings)

September 8th, 2006Malaysia Guides, Recipes26 Comments
print Recipe: BBQ Chicken Wings Ingredients:
10-12 chicken wings
For Marinate:
5 shallots (peeled and chopped into small pieces)
5 garlic (peeled and chopped into small pieces)
2 inches of ginger (peeled and chopped into small pieces)
1 teaspoon of dark soy sauce
5 teaspoon of soy sauce
3 dashes of white pepper powder
3 dashes of sesame oil
Sugar to taste
Salt to taste
Method:
Marinate the chicken wings for 12 hours. Grill over fire and constantly turning them so they are evenly grilled. Serve hot.

Sunday, March 11, 2012

Almond Tart


source:

http://www.amateurgourmet.com/2012/03/lindsey-sheres-legendary-almond-tart.html


Lindsey Shere’s Legendary Almond Tart

March 6, 2012 | By | 21 Comments almondtartslice
I suppose I must really like a challenge because, on the night that I made the bouillabaisse, I also attempted a famously difficult dessert: Lindsey Shere’s Almond Tart.
Lindsey Shere, in case you don’t know, helped open Chez Panisse in 1971 and stayed there as pastry chef until 1998. I first heard about her famous almond tart on my trip to San Francisco in 2007; I think it was at a place called Jojo in Oakland, with my friends Derrick and Melissa, that I first heard tell about it. The word “legendary” might’ve been applied.

I filed it away in my brain and at various points in my life considered making it. But two factors held me back: (1) the making of the tart dough, which sounded tricky; and (2) the fact that this filling, made with cream, might bubble over and ruin my oven.
Then David Lebovitz blogged about it and I gained courage. Turns out the tart dough doesn’t need to be rolled, you can press it into the pan (after refrigerating and letting it come back to room temperature):
tartdough
pressdoughintotartshell
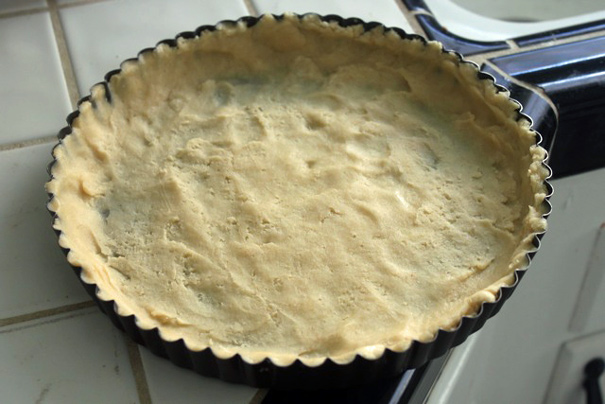
Then you bake it–no need to add weights–and it comes out looking nice and brown:
tartshell
David warns that if the sides collapse, you should push them back up mid-baking but I didn’t do that (I was scared to ruin the crust) and with my slightly collapsed sides, there was danger of the filling running over (which I think it did–but turns out it didn’t really matter. Except in detaching, as you’ll see in a moment.)
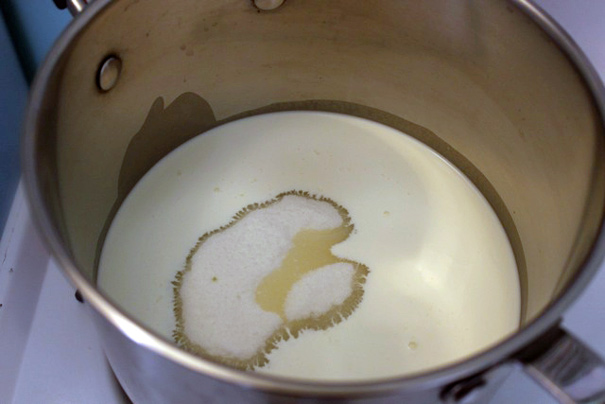
The filling is pretty incredible. You heat cream and sugar:
creamandsugar
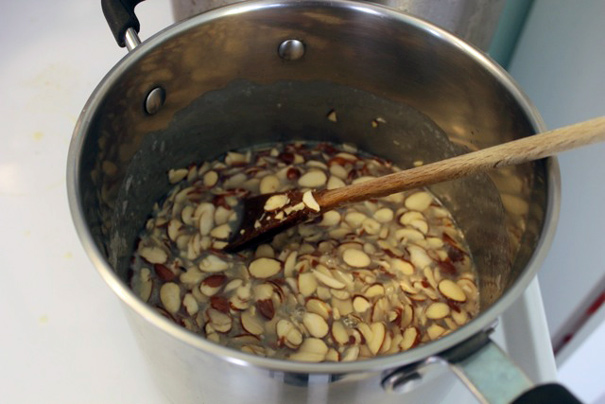
And when it starts to foam up, you add a cup of slivered almonds, almond extract and Grand Marnier (or Amaretto).
almondsincream
Pour that into your tart crust:
tartpreoven
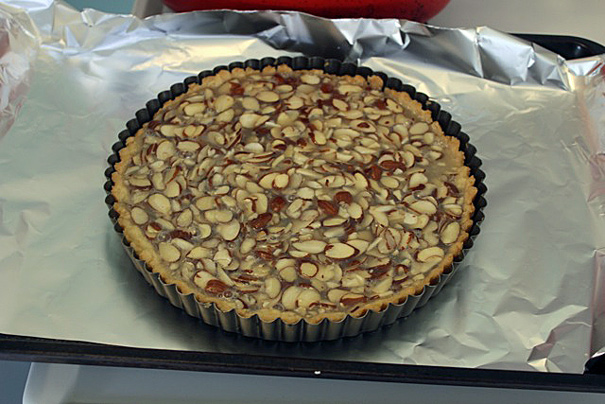
And as you can see, I placed the tart on a foil-lined cookie sheet to deal with any bubble-up (to protect my oven). It worked like a charm. 
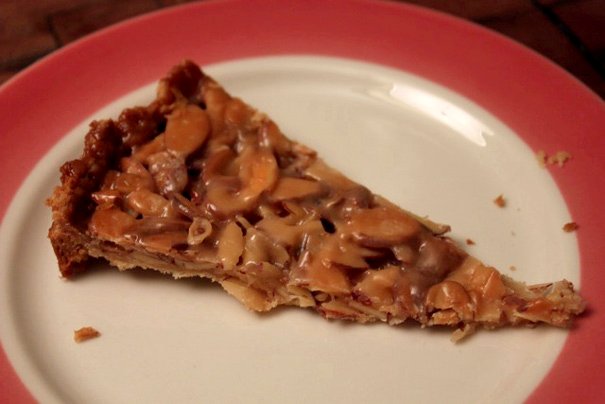
Here’s the finished tart:
cookedtart
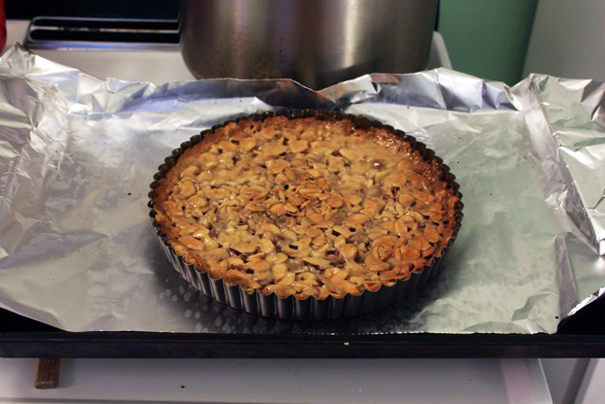
The only problem I encountered, after the tart cooled and I removed the sides (by pressing up from the bottom) was removing that bottom piece which was stuck on like glue. (So that’s why you want the sides of the tart built up, so the filling doesn’t bubble over and create a sort of caramel cement on the bottom.)
tartissues
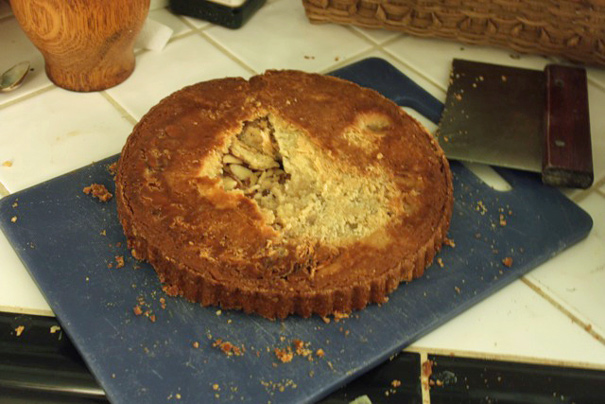
That may look disastrous but worry not! When flipped back over, no one knew the difference. Everyone “ooohed” and “ahhhed” when I brought this to the table:
tartfromtheside
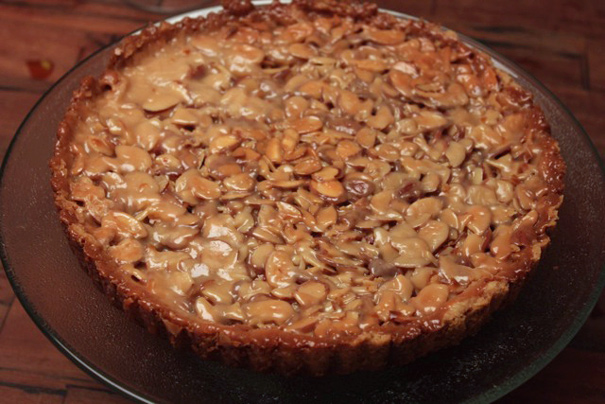
And the taste! Like the most sophisticated, refined candy bar you can imagine: a buttery crust, a crispy, caramel interior with almond crunch and flavor. The cream keeps things gentle–you don’t wind up with brick (as once happened when I attempted a similar tart here).
There’s a reason this tart is legendary: it lives up to the hype. And even if you have to unhinge the bottom with a blowtorch, it’ll be well worth it.

Recipe: Lindsey Shere’s Legendary Almond Tart

Summary: From The Chez Panisse Menu Cookbook by way of David Lebovitz.

Ingredients

  • 1 cup flour
  • 1 tablespoon sugar PLUS 1 cup for the filling
  • 1/2 cup chilled unsalted butter, cut into cubes
  • 1 tablespoon ice water
  • 1/2 teaspoon vanilla extract
  • 1/8 teaspoon almond extract PLUS 1/8 tsp for filling
  • 1 cup heavy cream
  • 1/8 teaspoon salt
  • 1 cup sliced almonds
  • 2 teaspoons Grand Marnier or Amaretto

Instructions

  1. First make the tart using a food processor. Pulse the flour and 1 tablespoon sugar together; then add all of the butter and pulse until it looks like coarse meal or grated Parmesan.
  2. At that point, add the ice water, the vanilla extract and 1/8 teaspoon almond extract. Pulse a few times until it starts to come together. If it doesn’t, open the top of the mixer and grab a fistful: if it holds together, you’re ready. Dump the contents on to a floured piece of plastic wrap and use the wrap to shape the dough into a disc. Wrap the disc and refrigerate for one hour.
  3. After an hour, remove the dough and allow it to come to room temperature. When it’s there, press the dough into a tart pan using your hands. I find the back of my hands worked best to flatten the dough on to the bottom; thumbs work well for pushing the dough up the sides. David Lebovitz recommends conserving a little dough in case you need to patch things up later–and that’s a smart idea.
  4. Put the tart shell in the freezer and chill thoroughly (about an hour).
  5. Heat your oven to 375 F and bake the shell for 20 to 30 minutes until it’s light golden brown. Remove from the oven and patch any holes with that leftover dough.
  6. Now make the filling: heat the cream, 1 cup sugar and salt in a big pot until it begins to boil. Keep cooking until it foams up, then immediately remove from the heat and add the almonds, almond extract and liquor.
  7. Pour the filling into the shell–being careful not to pour over the height of the crust (in case your crust shrank during cooking). Place the tart on a cookie sheet lined with aluminum foil and bake about 30 minutes (it took mine longer) until the tart is the color of coffee. David recommends you tap the top of the tart with a rubber spatula every 10 minutes or so to avoid the “corn flaky” look–but stop as the filling sets up.
  8. When the tart is done (and color really is the only way to know), remove it from the oven and cool for a few minutes on a cooling rack.
  9. Use a paring knife to detach the crust from the sides of the tart pan and then press up from the bottom. Allow to cool completely and just before serving, flip the tart upside down and remove the bottom. If you have trouble like I did you can use a bench scraper or chef’s knife to detach it or do as David suggests and set the tart on top of a warm stove burner for a second or two and it should come right off.
  10. You can serve this with ice cream or creme fraiche, but we enjoyed it just by itself.
Preparation time: 45 minute(s)
Cooking time: 1 hour(s)
Number of servings (yield): 8